If you’ve just started using Apollo and are trying to understand its API better, you’re in the right place.
In this guide, we’ll explain the Apollo API in simple terms and show you how to set it up for your company.
We’ll cover the different API groups and their functionalities, making it easier for your team to leverage Apollo in your workflows.
Table of Contents
What is an API?
An API, or Application Programming Interface, allows different software applications to communicate with each other.
In the context of Apollo, the API lets you integrate Apollo’s features directly into your technology stack, streamlining operations and reducing manual effort.
Why is the Apollo API Important?
The Apollo API is crucial because it enables seamless integration of Apollo into your existing technology stack.
This integration simplifies your sales process and reduces the manual effort required for prospecting and outbound work.
By using the Apollo API, your team can focus on more strategic tasks, speeding up the process of identifying potential customers.
Overview of Apollo API Groups
The Apollo API is divided into several groups, each designed to perform specific functions within Apollo.
Here’s a breakdown of these API groups:
Enrichment API:
This API enriches contact information in bulk, providing details like email addresses and mobile numbers.
You can enrich up to 10 records at a time, with one export credit for each non-empty record returned.
People API:
Similar to searching for people in Apollo’s interface, the People API allows you to search for individuals in Apollo’s database programmatically.
This API doesn’t provide email addresses, but you can export up to 100 people for one export credit.
Organizations API:
This API lets you search for organizations in Apollo’s database and access active job postings.
It’s useful for identifying companies that may need your products or services. Like the People API, you get one export credit per 100 companies.
Opportunities API:
Moving into Apollo’s CRM functions, the Opportunities API allows you to create, view, and update deals associated with companies and people.
Contacts API:
This API enables you to create new contacts in Apollo from other systems, update contact details, search for contacts, and manage contact ownership and stages.
Note that it does not handle deduplication.
Accounts API:
Similar to traditional CRM functionalities, the Accounts API allows you to create and update companies in your database, search for accounts, and manage account stages and ownership.
Sequences API:
If you’re using Apollo for outbound emailing and sequences, this API lets you create and manage email sequences programmatically.
How To Configure Access To Apollo.io API Key
To use the Apollo API, you need to set up an API key for your company. Here’s how you can do it:
Step 1: Access Apollo
- Log into Apollo: Use your credentials to log into your Apollo account. If you don’t have an account yet, you’ll need to create one.
Step 2: Navigate to API Settings

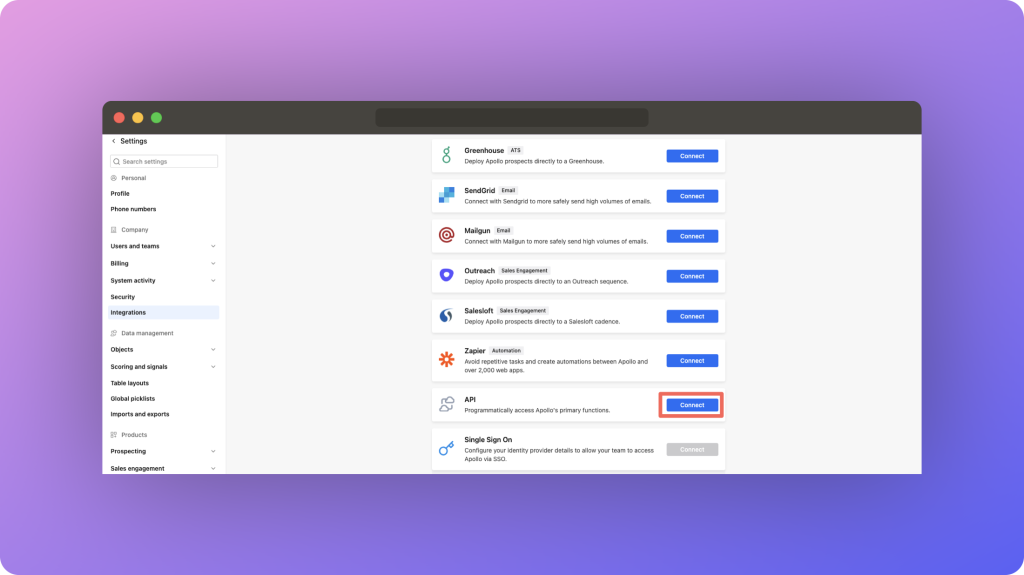
- Go to Settings: In the bottom left corner, you’ll see a cog wheel labeled “Settings.” Click on this cog wheel to access the settings menu.
- Select Integrations: Once in the settings menu, you’ll see a left navigation bar. Look for the tab called “Integrations” and select it.
- Scroll to API: Scroll down within the Integrations section until you find the “API” tab. Click on the “Connect” button next to it.
Step 3: Generate a New API Key

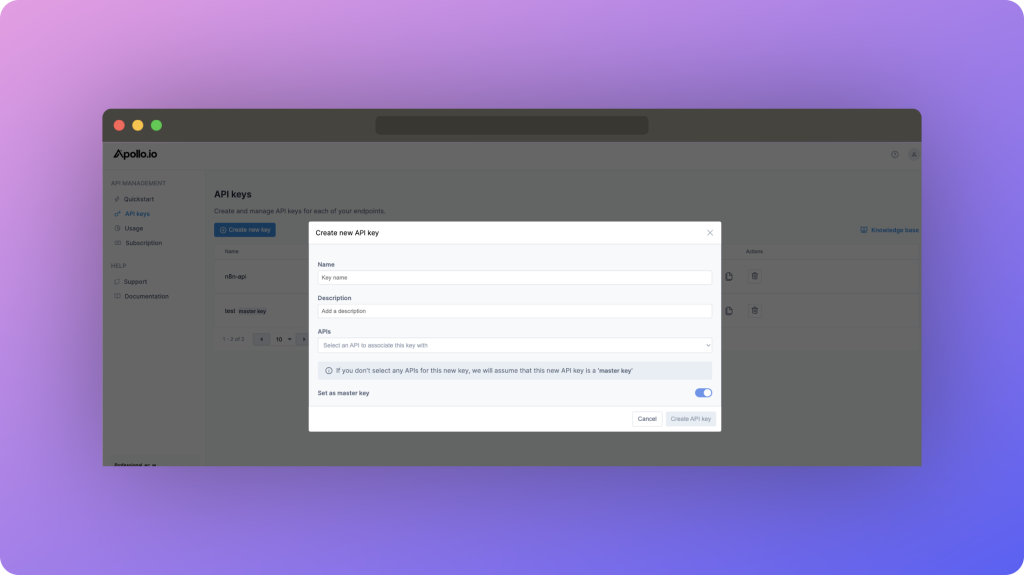
- Open API Key Management: After clicking “Connect,” you will be presented with the Apollo API Quick Start screen. On the left side of this screen, find the navigation bar and select “API Keys” under the API Management section.
- Create a New Key: Click on the “Create new key” button. A pop-up screen will appear.
- Fill in the Necessary Information: In the pop-up screen, provide the required information:
- Name of the Key: Choose a name that reflects its use case, such as “Sales Automation” or “CRM Integration”.
- Description: Add a brief description of what this key will be used for.
- API Key Association: Select an API to associate this key with
- Create API Key: Once all these areas are filled out select “Create API Key”
Step 4: Secure Your API Key
- Store the Key Securely: Once generated, the API key will be displayed. Copy this key and store it in a secure location, such as a password manager. Do not share this key publicly or with unauthorized personnel.
- Regenerate if compromised: If you suspect that your API key has been compromised, regenerate a new key immediately and update your applications to use the new key.
Step 5: Test Your API Key
- Use a Testing Tool: Before integrating the API key into your application, use a tool like Postman to test it. This ensures that the key is working correctly and has the appropriate permissions.
- Send a Test Request: Send a simple request to one of the API endpoints, such as the Contacts API, to verify that the key is functioning as expected. Check for any errors and ensure that the response data is correct.
Conclusion
Understanding and leveraging the Apollo API can significantly enhance your team’s efficiency by integrating Apollo’s powerful features into your existing workflows.
By using the various API groups, you can automate many tasks that would otherwise require manual effort, allowing your team to focus on more strategic activities.
By following this guide, you should have a better understanding of the Apollo API and how to set it up for your company.
If you have any questions or need further assistance, feel free to reach out.


